
Snowflake for SQL Server Users - Part 9 - Stages
Snowflake has the normal options in its SQL language for using INSERT statements to add data to a table. But it also has bulk options for rapidly adding a lot of data to a table via the COPY command. The same command can be used for bulk export as well.
A curious aspect of this though, is that because it’s a cloud-only database system, you can’t just use COPY to get data to/from a local file system. COPY works to/from what’s called a stage.
A stage is a cloud-based storage location, that’s just used as a staging location for data.
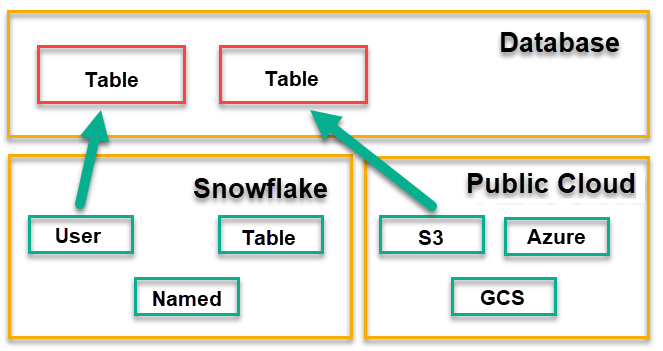
There are two basic types of stages: the ones provided within Snowflake itself, and the ones that are located in public cloud providers. For the public cloud providers, you can currently choose one of:
- AWS S3 bucket
- Azure storage location
- Google cloud storage (GCS)
When you work with these, you can specify them as an external location (where you put the full address), or you can create an external stage. An external stage is just a name that you give to details of the location. That lets you just use a name, and not have to repeat details of where the location is, all through your code.
The stages provided by Snowflake are as follows:
- Each user has a default stage when they are connected. A user stage is referred to by the name @~ and is automatically created for you.
- Each table in the database also has a default stage associated with the name of the table. You refer to a table stage as @%tablename and again, these are automatically created for you.
- You can also ask Snowflake to create a stage for you. You create an internal named stage by using the CREATE STAGE command. These are normally permanent but you can also make them session-temporary by adding the word TEMPORARY when creating them.
Next time, we’ll look at the types of files that Snowflake can import/export.
For an index to all posts in this series, see the first post here.
2019-10-04